

After switching to Hugo to create my website, I was missing a commenting system. Actually, When I was using WordPress, I never did receive very many comments. I still want to give folks the ability to leave comments. I wanted a simple, self-hosted solution that would work with my VPS. My VPS provider does not permit root access, so that was an additional restriction. My VPS does support using a “rootless” version of Docker, and I learned that Comentario supports using a Docker image.
This post describes how I set up a self-hosted Comentario commenting system, using Docker, that will work with a Hugo website. My Hugo website and the Comentario system runs on my Fully-managed VPS (with no root access) provided by Pair.
The following describes what worked for me. Please feel free to suggest improvements in the comment section at the end of this post.
Privacy-focused Lightweight Commenting Engine
In a nut shell, that describes Comentario. Their website shows a list of features. Their system is well documented. I am going to hit on the highlights about what I did to integrate their system with my Hugo website. You can also read about how they value privacy. Their system supports various ways to login and leave a comment. You can configure various social logins such as Google and GitHub. You can login via an email address (which is not displayed). And there is even optional anonymous access. I chose to use Google, GitHub, email access, and anonymous access. If I start getting too many spam comments, I will turn off the anonymous access.
I was using Remark42 to add a commenting system to my Hugo site. I really did like it. You can still read my post about how to set it up. One reason for switching to Comentario is the Administration UI that it offers. You can use it to configure your users, domains, and some additional configuration options. You also use it to moderate your comments before they go live. Finally, it provides some basic page view statistics that displays your top performing pages.
As part of my Pair environment, I am also using a reverse proxy. Pair provides the ability to easily create a reverse proxy for my comments hosting domain.
Set Up Your Environment
You need to ensure that docker and docker-compose is working on your host. There are many excellent Docker tutorials on the net, so I will not cover the details of installing and using it. On my Pair host, I was able to install it with one click in my control pannel. You can refer to the Docker Docs to get started. After Docker is installed, you can run the docker run hello-world command to verify your installation.
$ docker run hello-world
Unable to find image 'hello-world:latest' locally
latest: Pulling from library/hello-world
e6590344b1a5: Pull complete
Digest: sha256:d715f14f9eca81473d9112df50457893aa4d099adeb4729f679006bf5ea12407
Status: Downloaded newer image for hello-world:latest

Hello from Docker!
This message shows that your installation appears to be working correctly.

To generate this message, Docker took the following steps:
 1. The Docker client contacted the Docker daemon.
 2. The Docker daemon pulled the "hello-world" image from the Docker Hub.
    (amd64)
 3. The Docker daemon created a new container from that image which runs the
    executable that produces the output you are currently reading.
 4. The Docker daemon streamed that output to the Docker client, which sent it
    to your terminal.

To try something more ambitious, you can run an Ubuntu container with:
 $ docker run -it ubuntu bash

Share images, automate workflows, and more with a free Docker ID:
 https://hub.docker.com/

For more examples and ideas, visit:
 https://docs.docker.com/get-started/
Next, you need to configure a subdomain, such as comments.example.com, to host your commenting system. I enabled “https” and a reverse proxy on my comments subdomain. With Pair, this only took a couple of clicks. The reverse proxy maps to http://localhost:8081.
Install the Comentario Docker Image
You are going to use docker compose to install and manage your Comentario commenting system (don’t use docker-compose). Do the following to verify that docker compose is installed and working:
$ docker compose version
Docker Compose version v2.29.1
Next, in my comments subdomain root, I created a docker-compose.yml file that defines my Comentario Docker configuration. The Comentario documentation provides an example docker-compose.yml file that you can customize to your needs. Here’s what my docker-compose.yml looks like:
---
services:
  db:
    image: postgres
    container_name: comentario-db
    restart: always
    environment:
      POSTGRES_DB: comentario
      POSTGRES_USER: comentario
      POSTGRES_PASSWORD: MyDbPassword
    volumes:
      - comentario-db:/var/lib/postgresql/data
    healthcheck:
      test: ["CMD-SHELL", "pg_isready"]
      interval: 5s
      timeout: 5s
      retries: 5
    networks:
      - comentario-network

  comentario:
    image: registry.gitlab.com/comentario/comentario
    container_name: comentario
    restart: always
    ports:
      - 127.0.0.1:8081:80
    environment:
      BASE_URL: https://comments.example.com
      PORT: 8081
      SECRETS_FILE: "/secrets.yaml"
    volumes:
      - ./secrets.yaml:/secrets.yaml:ro
    depends_on:
      db:
        condition: service_healthy
    networks:
      - comentario-network

networks:
  comentario-network:
    name: comentario-network

volumes:
  comentario-db:
    name: comentario-db
This Comentario Docker configuration requires a second file, secrets.yaml, in the same directory:
postgres:
  host:     comentario-db
  port:     5432
  database: comentario
  username: comentario
  password: MyDbPassword

smtpServer:
  host: your.smtp.server
  post: 587 (or 465)
  username: YourEmailUserName
  password: YourEmailSmtpPassword

idp:
  github:
    key:    YourGithubIdpKey
    secret: YourGithubIdpSecret

  google:
    key:    YourGoogleIdpKey
    secret: YourGoogleIdpSecret
The docker-compose.yml file
In addition to the Comentario Docker compose example, I have added a few additional configuration options. The networks section creates a named internal Docker network; otherwise, Docker creates a long default network name. The volumes section is more important, especially if your Docker system is running in a rootless mode. I am creating a named volume to store comment data instead of a bind mount as shown in the example configuration.
Docker creates volume data under docker ownership. I discovered this when I was experimenting with Remark42, using an example configuration file. I could not delete the example volume bind-mounted data because I did not have root access. I had to contact support and ask them to delete the data for me. When using the named volume mode, you can use docker compose commands to manage the volume data, including deleting it if you need to.
You will want to generate a secure Postgres DB password. To generate a “a long random string” for the DB password, I used the Homebrew pwgen tool. For example:
$ pwgen -s 24 1
iPdJ3bipU2rHnsF0QVjpp8xH
You can adjust the string length (24) as desired.
The ports Comentario service definition allows access to the Comentario instance on the local host, including the reverse proxy. But it blocks access from an external IP.
The secrets.yaml file
This is where the DB, SMTP, and IDP (Identity Provider) details are defined. The Comentario documentation provides detailed documentation for how to set up the Identity Provider Configuration for various providers.
Starting the Comentario Containers
Change directory to the location of your docker compose configuration. Pull and start the Comentario and Postgres DB containers, using the docker compose up command:
$ l
docker-compose.yml  secrets.yaml

$ docker compose up -d
[+] Running 19/19
 ✔ comentario-db Pulled                                           21.2s
   ✔ 1f3e46996e29 Pull complete                                    0.9s
   ✔ 1ddaf56854cd Pull complete                                    1.1s
   ✔ 3cf4f77660fd Pull complete                                    1.5s
   ✔ f562efc34463 Pull complete                                    1.8s
   ✔ d6eaa17dfd6a Pull complete                                   12.8s
   ✔ fdcefadb5bb3 Pull complete                                   14.2s
   ✔ badd2a25d9ca Pull complete                                   15.4s
   ✔ f699f32c0574 Pull complete                                   16.6s
   ✔ 75de42a401ce Pull complete                                   18.5s
   ✔ c48dc11d8978 Pull complete                                   19.6s
 ✔ comentario Pulled                                               8.3s
   ✔ 38a8310d387e Pull complete                                    2.2s
   ✔ b553db7b0332 Pull complete                                    2.5s
   ✔ c2531f849517 Pull complete                                    2.9s
   ✔ b5ff2d70e46f Pull complete                                    3.3s
   ✔ 8cc3016ddca8 Pull complete                                    3.5s
   ✔ 73922f0d4b02 Pull complete                                    4.5s
   ✔ 4f4fb700ef54 Pull complete                                    5.9s
[+] Running 4/4
 ✔ Network comentario-net   Created                                0.3s
 ✔ Volume "comentario-db"   Created                                0.0s
 ✔ Container comentario-db  Healthy                               10.5s
 ✔ Container comentario     Started                                9.1s
You will see each subimage being pulled down and installed. Your final state should look simalar to the above.
You can verify that the Comentario and Postgres DB images are installed:
$ docker image ls
REPOSITORY                                  TAG                 IMAGE ID       CREATED       SIZE
registry.gitlab.com/comentario/comentario   latest              97a9d7f2bcfd   6 weeks ago   36.2MB
postgres                                    17-alpine           3fe19d60f9ca   7 weeks ago   278MB
The first time when you run the docker compose up -d command, the persistent volume, comentario-db, is created. You can verify that the comentario and comentario-db containers are running:
$ docker ps
CONTAINER ID   IMAGE                                                    COMMAND                  CREATED          STATUS                    PORTS                                       NAMES
37046cd538cc   registry.gitlab.com/comentario/comentario                "/comentario/comenta…"   25 minutes ago   Up 25 minutes             127.0.0.1:8081->80/tcp                      comentario
64fdd0a24c34   postgres:17-alpine                                       "docker-entrypoint.s…"   25 minutes ago   Up 25 minutes (healthy)   0.0.0.0:5432->5432/tcp, :::5432->5432/tcp   comentario-db
And you you can view the persistent volume:
$ docker volume ls
DRIVER    VOLUME NAME
local     comentario-db
You can stop and start Comentario with these commands:
$ docker stop comentario comentario-db
comentario
comentario-db

$ docker start comentario comentario-db
comentario
comentario-db
Set Up the Administration UI
When your Comentario system is running, you should immediately create a Superuser who will have system-wide permissions. The first local user signing up with an email address and password will automatically receive the superuser privilege. Go to your Comentario URL (e.g., https://comments.example.com) and click on Sign up here to create your first (Super) user. After creating your user, log in to the system. You should see a Dashboard that looks like:
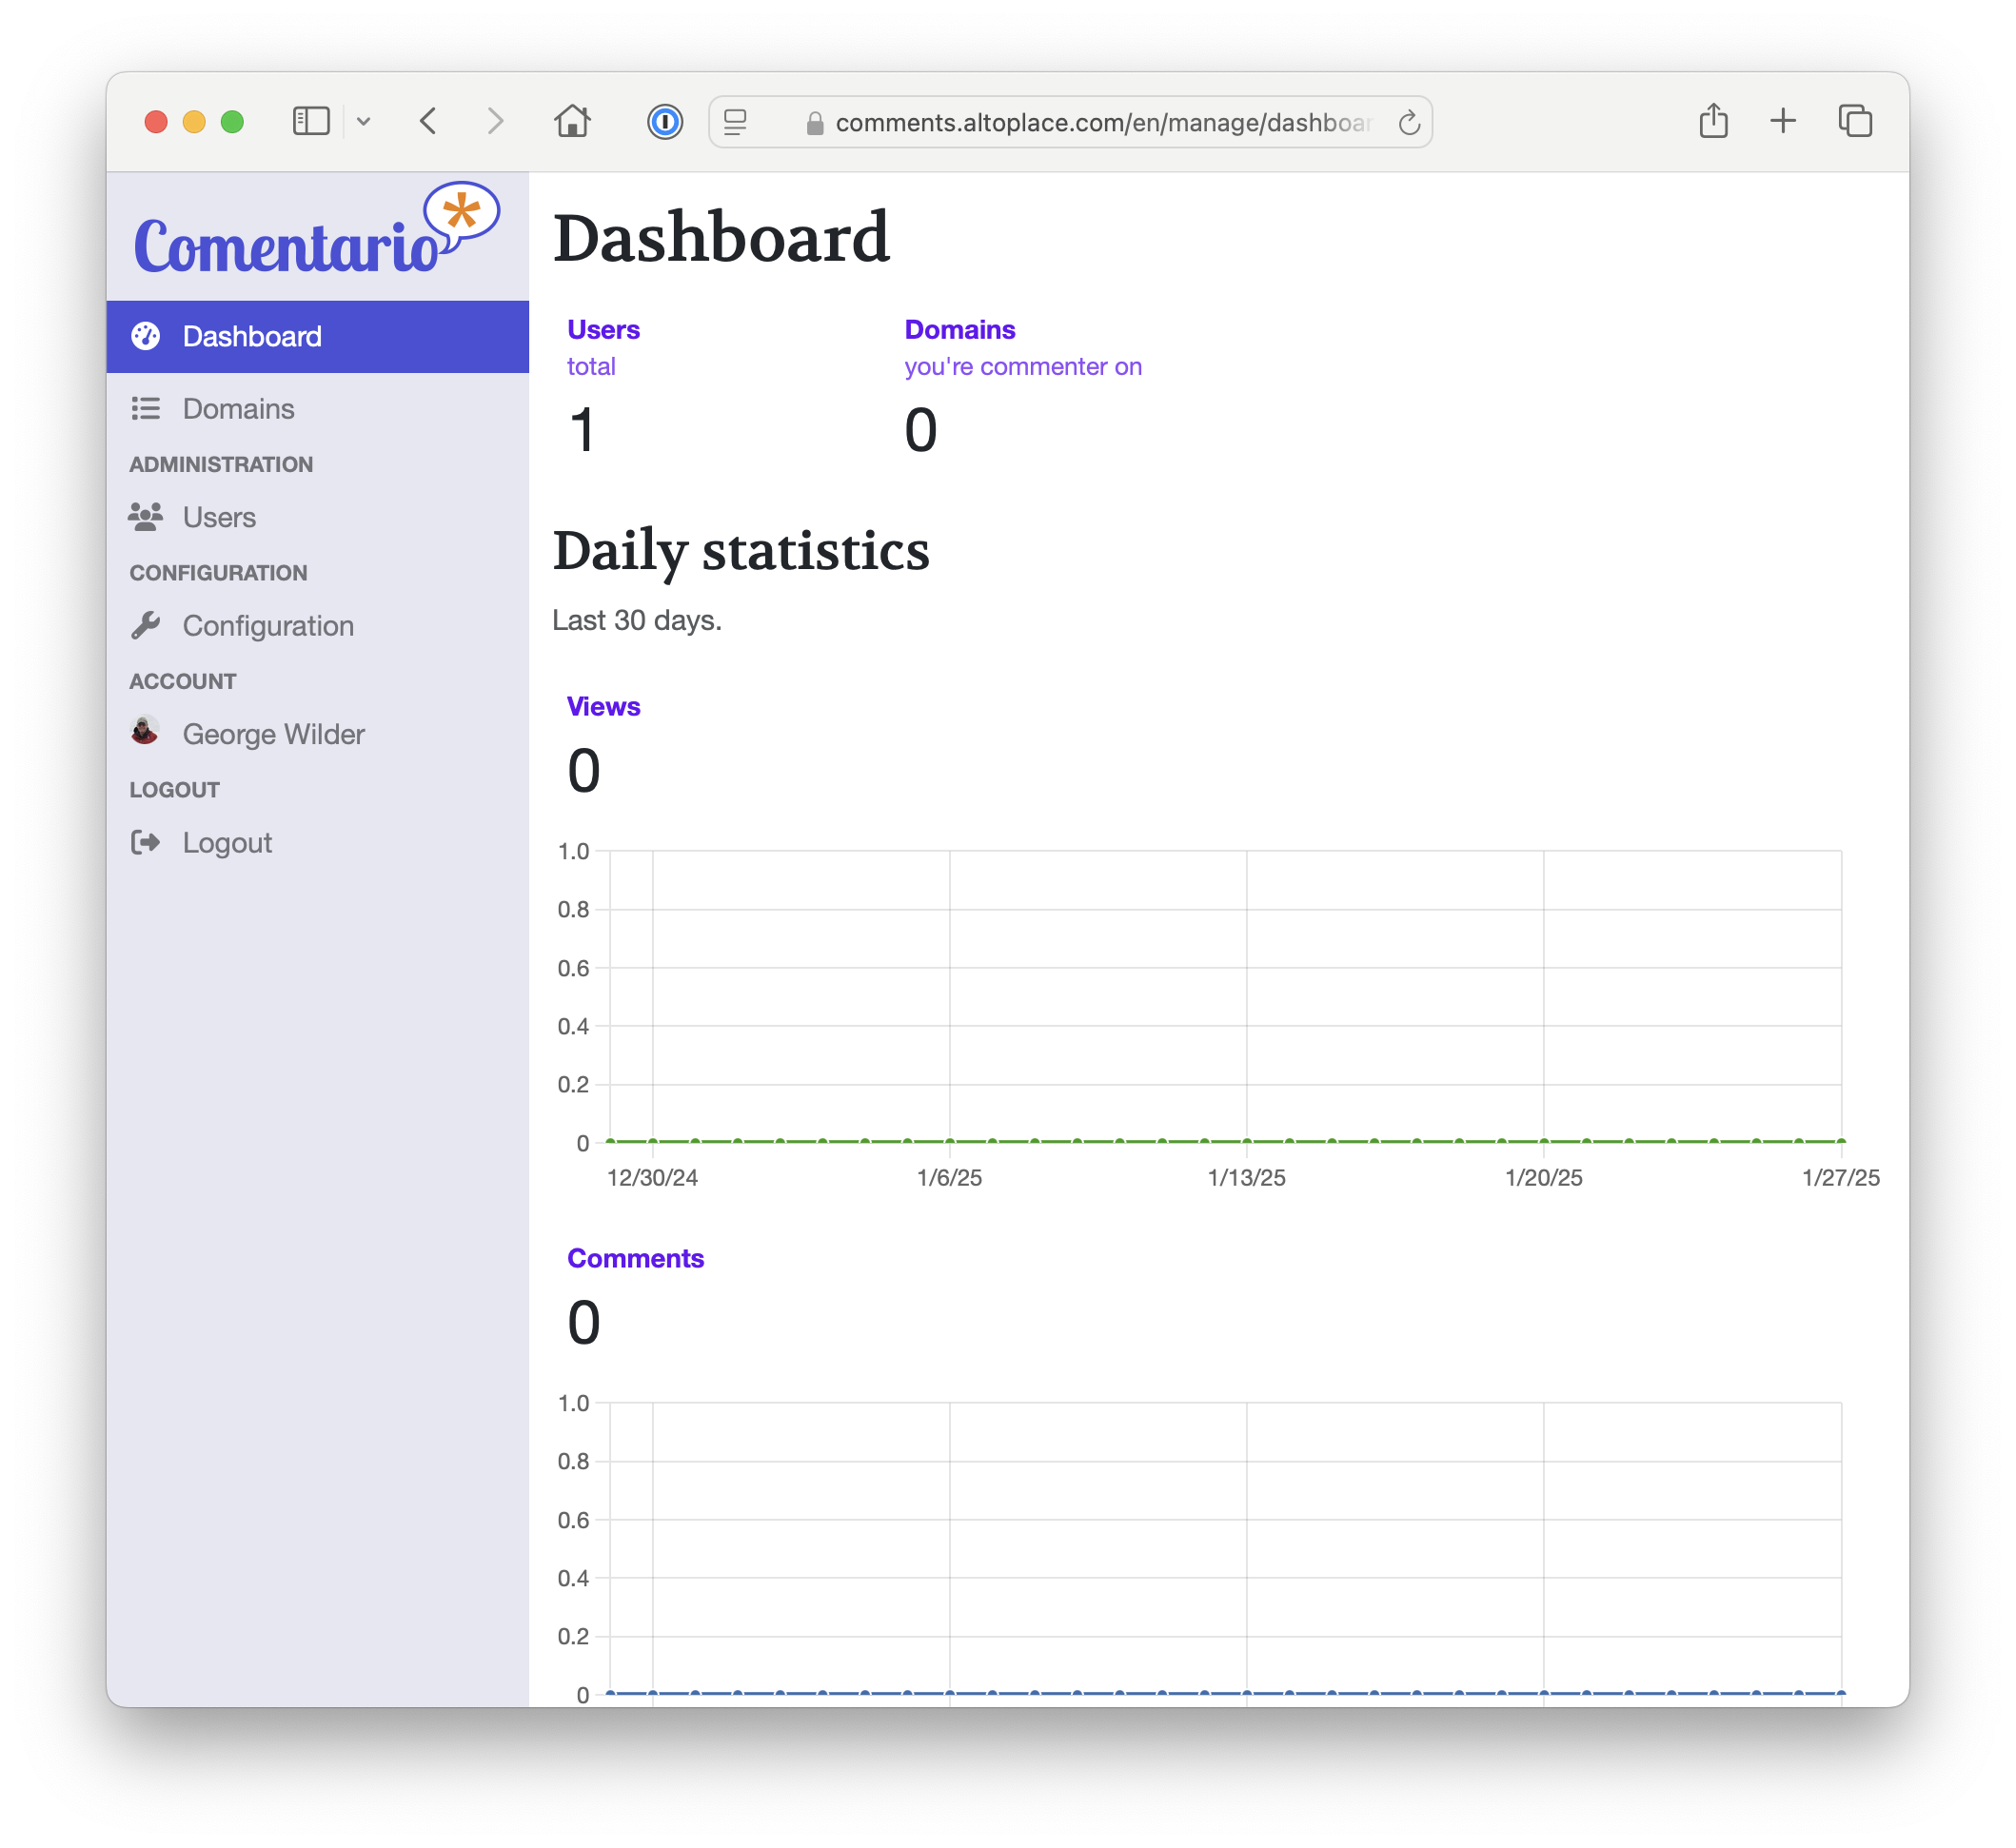
Notice that it shows 1 user (your Superuser) and 0 domains. You need to click the Domains tab on the left column and add your website domain to enable commenting on your website. After you create your domain, you can click on it and edit your settings. There you can change or set various options. For example if you want to allow anonymous comments, you need to enable the Commenting without registration option under the Authentication tab.
Integrate Comentario with Hugo
Exactly how you do that will depend on which Hugo theme you are using. The Comentario documentation shows the general requirements for embedding comments in a website. For example, I added the following to layouts/_default/single.html at the position where I wanted the comments to appear:
{{ if .Site.Params.comments.enable }}
  {{ partial "comments.html" . }}
{{ end }}
In my Hugo site configuration file (hugo.yaml or config.yaml), I added:
params:
  comments:
    enable: true
Finally, at a minimum you need to add something like the following to the layouts/partials/comments.html file:
<script defer src="https://comments.example.com/comentario.js"></script>
<comentario-comments></comentario-comments>
If want to add styling and light/dark mode switching, you could add something like:
<script defer src="https://comments.example.com/comentario.js"></script>
<script>
  window.addEventListener("load", () => {
    const comentarioComments = document.getElementsByTagName("comentario-comments");
    const defaultTheme = "{{ .Site.Params.your_default_color_theme }}";
    const isToggleEnabled = {{ .Site.Params.your_color_scheme.toggle | jsonify }};
    const userTheme = localStorage.getItem("theme"); // current site color theme

    function setComentarioTheme(mode) {
      if (mode === "dark") {
        for (const commentElement of comentarioComments) {
          commentElement.setAttribute("theme", "dark");
        }
      } else if (mode === "light") {
        for (const commentElement of comentarioComments) {
          commentElement.setAttribute("theme", "light");
        }
      }
    }

    if (isToggleEnabled) {
      if (userTheme) {
        setComentarioTheme(userTheme);
      } else {
        setComentarioTheme(defaultTheme);
      }
    } else {
      setComentarioTheme(defaultTheme);
    }

  });
</script>

<div class="post__comments">
  <comentario-comments lang="en"></comentario-comments>
</div>
If you want to hardcode the light or dark color mode, you can add the theme attribute to the Comentario tag and set it equal to “light” or “dark”.
The default color mode is light.
You can look below to see the final results. Better yet, try leaving a comment!
Updating
It’s a great sense of accomplishment to get Comentario working. But how do you apply software updates to either the Comentario or Postgres DB services? I was asking myself this question after I noted in the Comentario UI that a new version of Comentario was available. I saw a red astrick by the Configuration menu item on the left side bar. After clicking on it, I noted the red astrick by the “Comentario version” parameter under the Static tab. Finally, there was a note stating that an upgrade was available. You can click on that upgrade note to see what has changed.
To apply the update, change directory to where your docker compose configuration files are located and execute the following commands:
$ docker compose pull
$ docker compose up -d
$ docker image prune -f
The first command downloads the updated image. The second command restarts the docker container with the new image. And the last command deletes the old image. After executing the up command, you might want to verify that Comentario is working ok before deleting the old image. It is possible to rollback to the previous image that was running. I haven’t actually tried rolling back to the old image, but I did find a good article that describes the Docker update procedure in detail, including how to rollback to the previous image if needed.
I have used the update procedure that I noted, and it has worked well for me.
Final Thoughts
I finally have a commenting system working with Hugo! It’s self-hosted, so I am not paying for an external 3rd party service. The comments stay on my server, under my control, so they remain private. I hope that I provided enough information for you to add commenting to your Hugo site. Please, let me know if something is not clear or you have a question. I will be happy to try to answer it. Just leave a comment below. 😄


Your Comments Are Welcome!
Use a Username and your Email Address to Sign In (your email address is not publicly displayed); you will receive an email token to confirm your email address. Or you can use your Google or GitHub account. Comment data is locally hosted via a Remark42 Docker image.